As more people choose to shop online, companies face challenges in securely and quickly handling payments. With a reliable system, you can avoid losing clients at purchase. Imagine a shopper investing 10 minutes exploring your website, selecting products to add to their cart, only to abandon the transaction due to a payment procedure that feels perplexing, sluggish, or insecure. That’s a lost sale and can often happen without the right solution. A payment gateway fixes this by connecting your website to your customer’s bank. It makes sure payments are handled safely, quickly, and instantly. Whether you run a small café or a growing online store, having a reliable payment gateway can greatly boost sales and keep customers happy.
What is a payment gateway?
A payment gateway is a service that enables online businesses to receive and manage payments. It connects your site, the client’s bank, and your business account, guaranteeing that all transactions are confidential and comply with regulations.
You can think of it like an online version of a card machine. When customers buy something online, the payment gateway takes care of their card details, checks them, and finishes the payment process.
Why Is It Important?
- Safety: Protects against scams using encryption and checks.
- Ease: Customers can pay anytime, day or night.
- Many Options: Accept cards, use PayPal, use digital wallets, and use other methods.
- For example, if you own a small clothing store in Sydney, having a payment system lets customers pay quickly, which helps boost sales.
Want help picking the best payment system? Talk to the experts at Make My Website.
Types of Payment Gateway Integrations
Different payment systems work in other ways, and picking the right one for your business can affect how easy it is for customers to pay. Payment systems come in various types—some are quick and easy to set up, while others let you fully change them to fit your business if you know how.
Knowing how payment systems can be set up will help you decide if a simple system like PayPal or a more advanced one like Stripe is better for your needs. In this part, we’ll look at the good and bad points and real examples to help you pick the best choice.
- Payment Gateways on Other Websites
Customers go to the payment company’s website (such as PayPal or Square) to finish the purchase.
- Pros: Simple to set up and very secure.
- Cons: Customers leave your site, which could make the experience less smooth.
- Example: PayPal is popular among small businesses in Australia, such as Etsy shops or local gyms that sell online memberships.
- Combined Payment Systems (Using APIs)
Payments are made directly on your website through the payment system’s API, giving a smooth checkout process.
- Advantages: Improved brand image and customer experience.
- Disadvantages: Needs technical knowledge and PCI compliance.
- Example: Stripe and eWay are common choices for expanding Australian businesses. For example, an online bakery in Brisbane can use Stripe to provide a seamless checkout experience without redirecting customers to another site.
- Special Payment Options
Big companies or businesses with special needs might choose a custom payment system made just for their business.
- Pros: Complete control and freedom to change things.
- Cons: Expensive to create and keep working.
- Example: A big store like JB Hi-Fi could use a custom system to handle daily sales.
How do payment gateways work?
Online payments may look quick initially, but a lot happens in the background. Payment gateways are very important from when a customer presses “Pay” until the money reaches your account. They protect data, approve payments, and keep the transaction safe.
This section will sequentially clarify the procedure, allowing you to understand its functionality and significance.
- Customer Payment Process: The client selects an item and provides payment details (such as a credit card or PayPal).
- Encryption: The payment system protects the data by making it secret.
- Authorisation Request: The secret data is sent to the payment handler.
- Bank Verification: The customer’s bank checks if there’s enough money.
- Approval or Denial: The bank says yes or no to the transaction and tells the payment system.
- Transaction Completion: Money moves and the customer and seller get a confirmation.
Real-World Example:
Imagine you operate a coffee delivery service in Adelaide. Clients subscribe to a monthly membership and settle their payments using their credit cards. The payment system ensures their card details are protected, communicates securely with their bank, and processes the transactions. In this manner, you receive the funds in your account.
How to integrate a payment gateway into your website
Incorporating a payment system into your website may appear tricky, but it can be straightforward. Whether you utilise WordPress, Shopify, or a platform you created independently, there are clear steps to adhere to. This includes choosing the right payment option and checking that everything works well. This way, your customers can pay quickly and safely.
Here are comprehensive and practical measures to assist you in smoothly incorporating a payment gateway into your site:
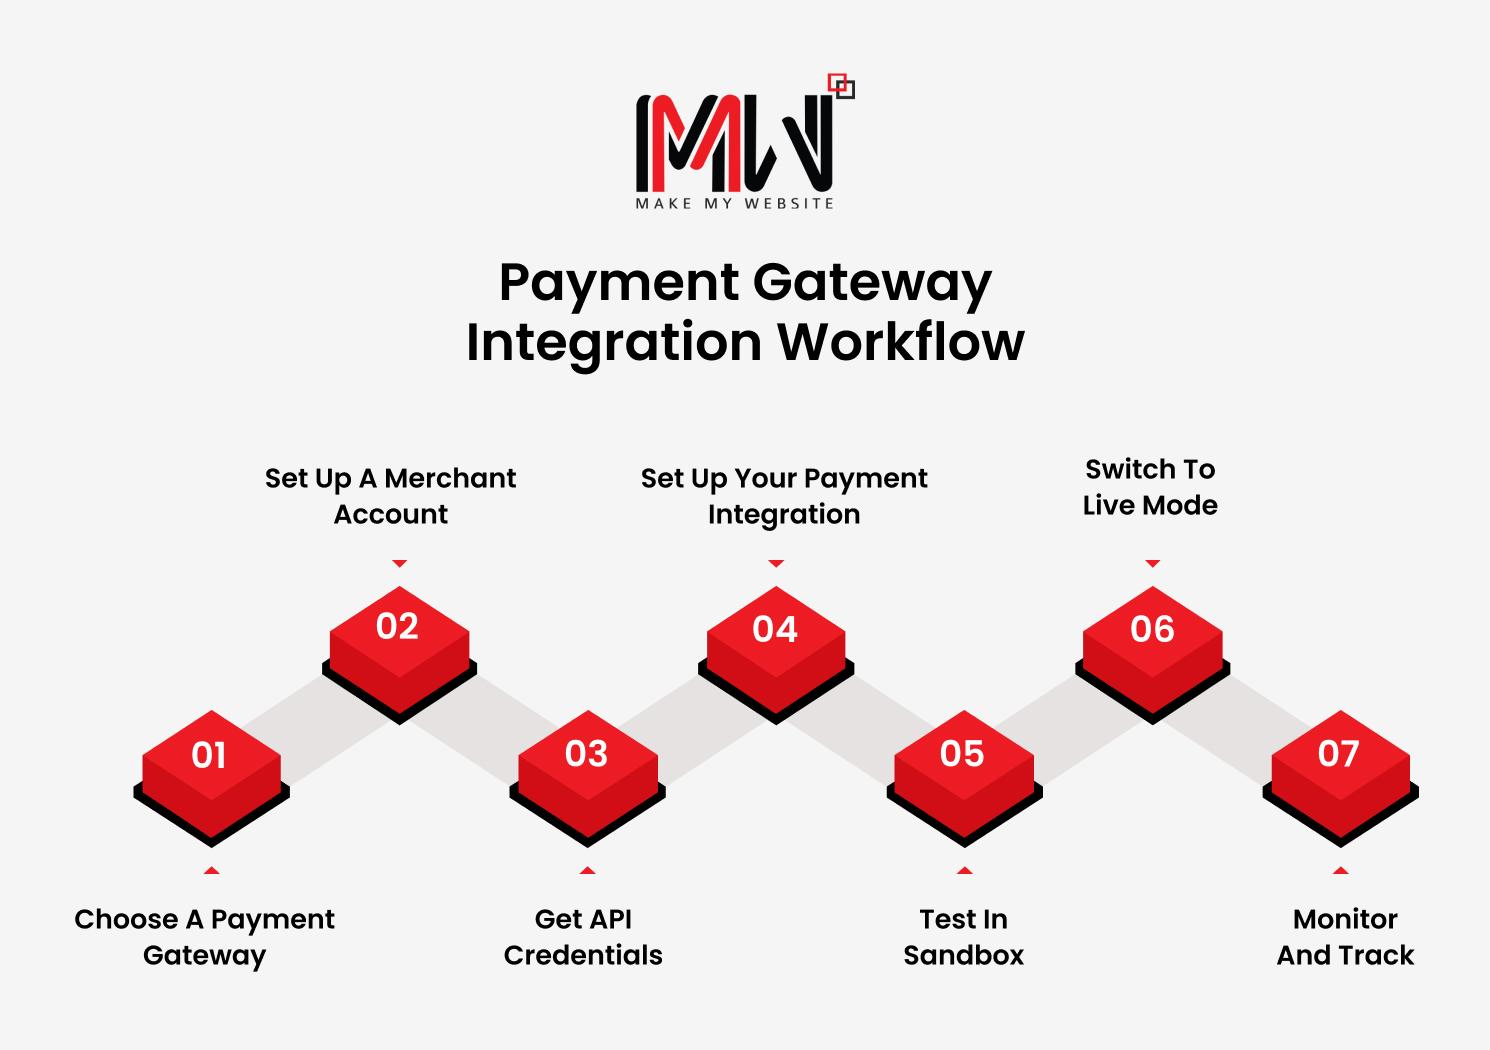
Step 1: Choose a Payment Gateway
The initial step is to select the appropriate payment solution for your enterprise. Consider the following factors:
- Expenses: Certain platforms, such as Stripe or Square, offer straightforward, flat-rate charges, like 1.75% plus 30 cents for every transaction in Australia.
- Payment Methods: Verify whether it accommodates credit card transactions, PayPal, Afterpay, or electronic wallets like Apple Pay and Google Pay.
- Currencies: Make sure it works with Australian Dollars (AUD) for local customers and supports multiple currencies if you sell overseas.
- Setup: Some systems, like PayPal, are easy to set up, while others, like eWay or Stripe, let you customise more.
For example, If you run a small online shop in Sydney, PayPal might be best for a quick setup. But if you’re creating a unique experience for your fashion brand in Brisbane, Stripe has better tools for customisation.
Need help determining which gateway is right for your business? Contact our team now!
Step 2: Set Up a Merchant Account
A merchant account is a unique banking account that enables you to accept online payments. Certain payment platforms (such as Stripe or Square) have a built-in merchant account, while others require you to set one up independently.
Steps to set it up:
- Contact your bank or a payment service like eWay or NAB Transact.
- Give them important business details, such as your ABN (Australian Business Number), company registration, and proof that your business is running.
- This process is easier if you use a complete service like PayPal or Stripe.
Step 3: Get API Credentials
After signing up for a payment gateway, you will need API credentials. These credentials consist of:
- Public Key: This identifies your account with the payment gateway.
- Secret Key: This is used to approve transactions securely.
- To locate them: Access your payment processor’s account (such as Stripe or Square) and navigate to the “API” or “Developer” area.
Step 4: Set Up Your Payment Integration
Now is the moment to incorporate a payment method for visitors to your site. The approach you take will vary based on the kind of website you operate:
- If you are utilising WordPress alongside WooCommerce
- Consider integrating a plugin like WooCommerce Stripe Gateway or PayPal for WooCommerce.
- Set it up with your API keys.
- Try out the payment process to make sure it works.
- If you use Shopify:
- Go to Settings → Payments in your admin area.
- Pick your favourite payment option (like Stripe, PayPal, or Afterpay) and connect it.
- If you built your website yourself:
- Follow the payment service’s instructions for developers to connect their system to your website.
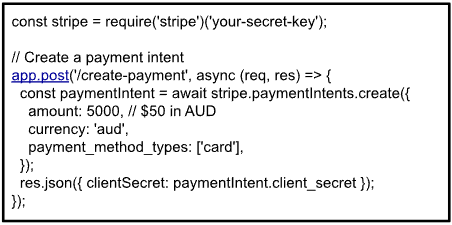
Example Code for Stripe (Node.js):
Step 5: Test in Sandbox
Before launching, check the integration in a test environment (sandbox mode). This makes sure everything works well without actual money being involved.
- Use special test cards from your payment service (like Stripe, which gives specific card numbers for testing).
- Try both successful and unsuccessful payments to find any problems.
- Check the whole payment process, from choosing items to confirming the order.
For instance, In sandbox test mode, you can utilise a dummy card such as 4242 4242 4242 4242 to evaluate a Stripe transaction.
Step 6: Switch to Live Mode
After testing, it works well:
- Change your payment gateway settings from practice mode to real mode.
- Use real API keys instead of practice ones.
- Ensure everything is set up correctly and that payments are sent to your business account.
Step 7: Monitor and Track
Once your system is active, keep an eye on transactions to make sure everything works well:
- Review Transaction Records: Look at the logs often to find any failed transactions or mistakes.
- Watch Analytics: Use the payment platform’s tools to see sales, refunds, and how people pay.
- Fix Problems Fast: If a customer has trouble with a payment, solve it quickly.
Helpful Hint: Services like Stripe and PayPal offer live reports to help you check how your business is doing.
Your Next Step Towards Seamless Payments
In the current competitive digital landscape, a secure, reliable, and user-friendly payment solution is essential for your company’s success. Whether serving customers in Melbourne or running an online store nationwide, choosing the right payment system can greatly improve customer satisfaction and boost sales.
However, selecting, incorporating, and verifying a payment option can be quite a task, particularly when you’re occupied with other aspects of your enterprise. This is precisely why we are here to assist you.
At Make My Website, we create robust, user-friendly websites that feature seamless payment solutions tailored to Australian companies. We handle everything, from choosing the right payment system to setting it up and testing it.
Want to give your customers a great payment experience? Contact us now!


